Sunday, June 3, 2012

Chick Nail Polish Hen House #FLBeautyBloggers Swag!

Sorry for this super late post today. I had a lousy morning and better part of my day and I am just starting to feel better now. I hate days like this. Luckily I have some awesome polish on my nail and another awesome polish to show you guys today. Chick Nail Polish was kind enough to sponsor our Beauty Bloggers of Central Fl meet-up we just held this past Saturday. So a HUGE thank you to Julie and Chick Nail Polish for sponsoring our event :D! I managed to get my hands on a Chick shade I had been really debating for whatever reason.. I'm so glad I have it now! I love me some Vampy Nubbies :D.
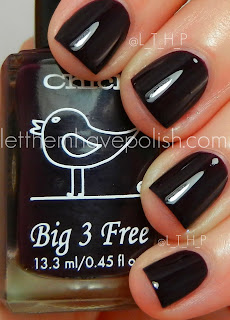
 This is Chick Nail Polish in Hen House. This is a delicious vampy Plum. This color is deep and sexy and perfect for a night out. The formula on this color is SO easy to work with, it practically applies itself. This is not a super dense creme so it gives this Plummy shade a touch of squishiness and I love that in my deep shades.

NAILS TIPS

To prolong the life of your nail polish; wipe around the top of the bottle with nail polish remover before replacing the lid. This prevents air getting in and causing the nail polish to thicken.
Never thin nail polish with nail polish remover. Most nail polish remover contains oil which can prevent the nail polish from drying properly and or cause it to chip and flake. Always use a specific nail polish thinning product or a few drops of pure acetone.
To remove stains from nails soak a cotton pad in a little pure lemon juice and place on the nails for a few minutes. Prevent staining by always using base coat under strong colours. If you have nail discolouration below the surface of the nail this may be caused by damage to the nail bed or a fungal nail infection. If in doubt consult your GP or pharmacist.
If you suffer from flaking or weak nails try replacing your usual nail polish remover with an acetone free version. Acetone is a key ingredient in most nail polish removers. It is dehydrating to nails and can exacerbate brittle and flaking nail problems. Cutex Acetone Free Nail Polish Remover (200ml £1.99 Boots.com). A good quality nail hardening product can also help with this problem such as OPI Nail Envy range or Sally Hansen nail hardening and strengthening products.
Always file your nails in one direction only. Seesaw filing action generates heat and causes friction which can damage the nail and lead to flaking and breaking.

Wednesday, February 1, 2012

Nail Paint Video


Nail Art Basics

Make sure your nails are in good shape. Learn how to keep your nails healthy and have beautiful nails. Your nails should not be bitten. You don't need a manicure to start creating nail art, but you do need to make sure that your nails are clean and shaped well enough that they look even.


Choose the right products. There are a multitude of different paints and polishes available for nail art, and your choice of products is completely up to you. Experiment with a few different brands and types of polish or paint to see which you like best, and don’t forget to give acrylic craft paints a try — these work great and are a whole lot cheaper than nail paints or polish.
  • You’ll also be able to choose from a variety of implements to help you apply your paint. You can buy professional-grade nail art kits that include all the brushes, stripers, and marbling tools you’ll need, or you can improvise. A toothpick or bobby pin, for example, can help you apply dots and swirl colors with precision, and thin-tipped detail brushes available at your local arts or hobby store can work just as well as special nail art brushes. In addition, remember that you can create art on your natural nails or on artificial tips, and the variety of artificial nails is truly dizzying.
  • Perhaps most importantly, though, make sure you have pure acetone for quickly removing mistakes, and have a small brush and/or Q-Tips, makeup pads, or cotton balls available solely for applying the acetone.
 Look for ideas and techniques. This article is a good primer, but if you have trouble coming up with ideas after a while, or if you want to get more in-depth information about techniques, consider these options:
  • Taking a class at your local nail salon. Just a few hours with a professional teacher can advance your skills like years of practice.
  • There are also a number of books on nail art. You may be able to find one in your local library or bookstore, but if not, buy them online.
  • Finally, the web is a great resource, especially if you’re just looking for new ideas. There are several sites on which people post their latest creations, and you can also find a few forums frequented by beginners and pros alike. Also, watch videos on sites such as YouTube that show you step-by-step how to do certain designs.
 Get your materials ready. While nail art requires a lot of patience, you’re also constantly working against the clock when you’re creating it, since the paints and polishes dry fairly quickly. Before you begin, make sure you have everything you need ready and accessible, especially acetone for quickly removing mistakes.
 Give your nails a base coat. Before you begin your nail art you need to create your canvas. Depending on the look you’re going for, you can paint your nails a neutral color, such as clear, white, pale beige or pale pink, or you can paint them any other color you desire. You may also wish to divide the nail into two or three different colors. Do two coats, as it strengthens the nail and gives a better finish. Make sure your “canvas” is neat and even, and allow it to dry thoroughly before proceeding.
 Create your nail art on top of the base coat. Dip your brush or other tool in one color of paint to make sure the paint adequately and evenly covers it. If your brush has globs, excess paint, or not enough paint, you’re going to have trouble painting. Keep your art simple. There’s plenty of room for creativity — you can create pictures, abstract designs, etc. to your heart’s content. However, don’t make your nails look too “busy.” Simple designs are often the most beautiful, and if you’re a beginner your chances of success are far greater the simpler your art is.
 Apply a top coat. Once all your nail art is dry, paint over it with a clear protective acrylic top coat to seal and protect your nail and your hard work.
 Care for your art. Reapply a clear top coat every two or three days to protect your art and keep your nails looking shiny. Apply cuticle oil daily. Treat your nails with care — wear gloves when gardening or doing other work, and exercise caution when performing tasks such as opening soda cans, as they may damage your nails.